Enter your domain name like ( yourdomainname.com) and then click on create a new record button
Now again visit hosted zone home page and there you will see your domain. Click on it and then create a new record
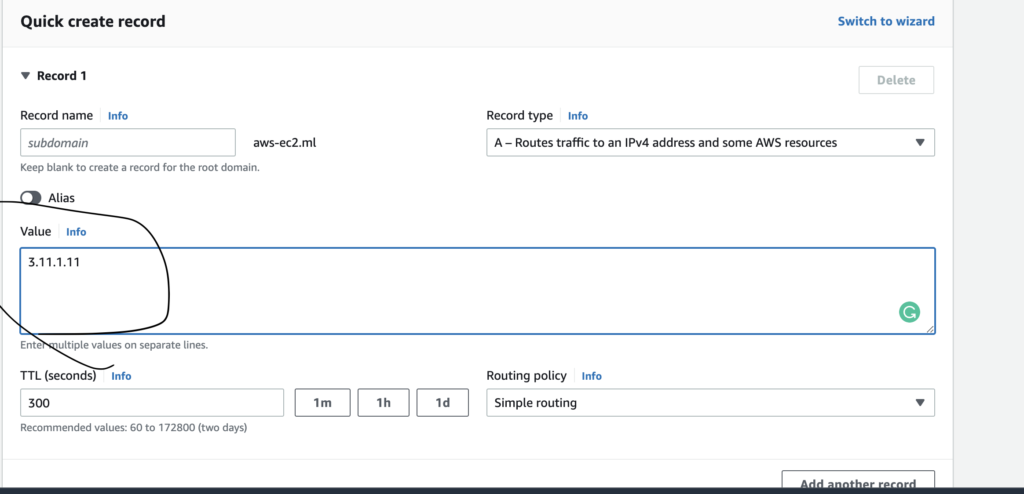
Add your ec2 ipaddress in the box and save it ( by clicking on the new record button )
After creating the record, select nameserver and change the name server of your domain ( explained in more detail below. Check it there )
Done
Detail Explanation to assign domain name to the ec2 instance
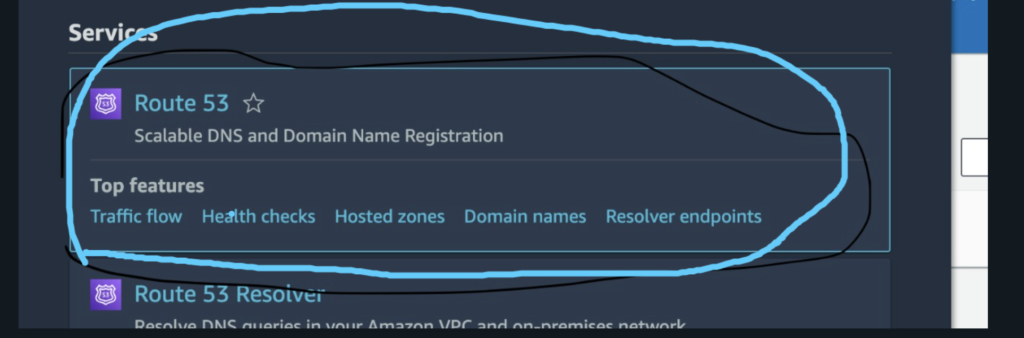
Go to the AWS Route53 service
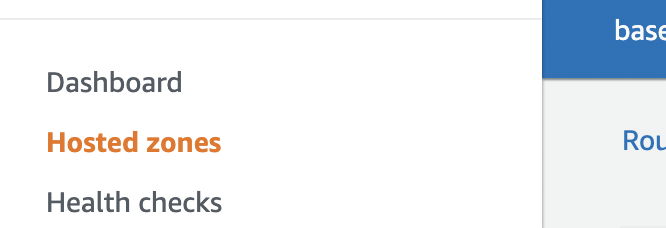
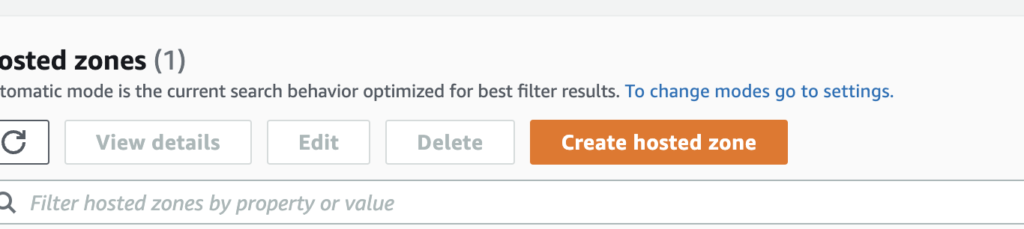
2. Select a hosted zone
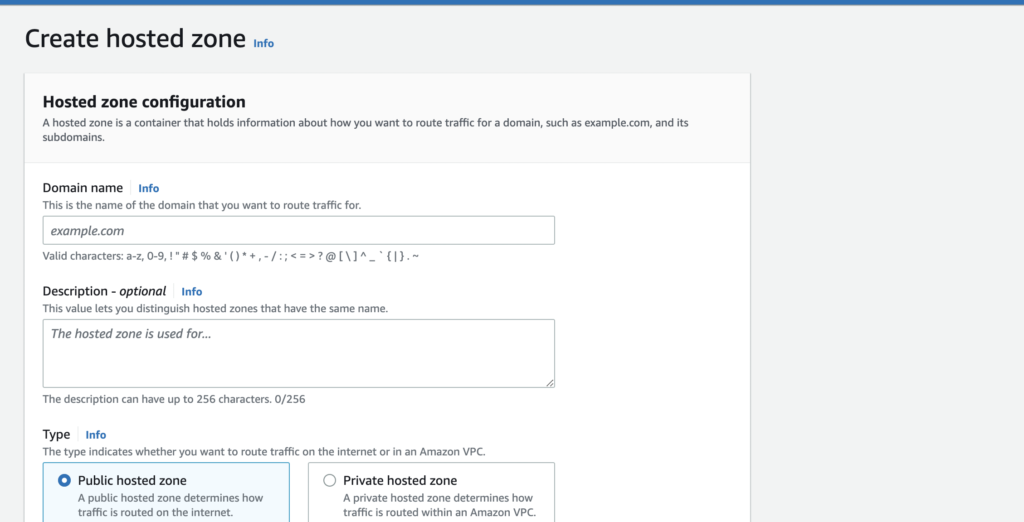
3. Create a new hosted zone
4. Enter your domain name like ( yourdomainname.com )
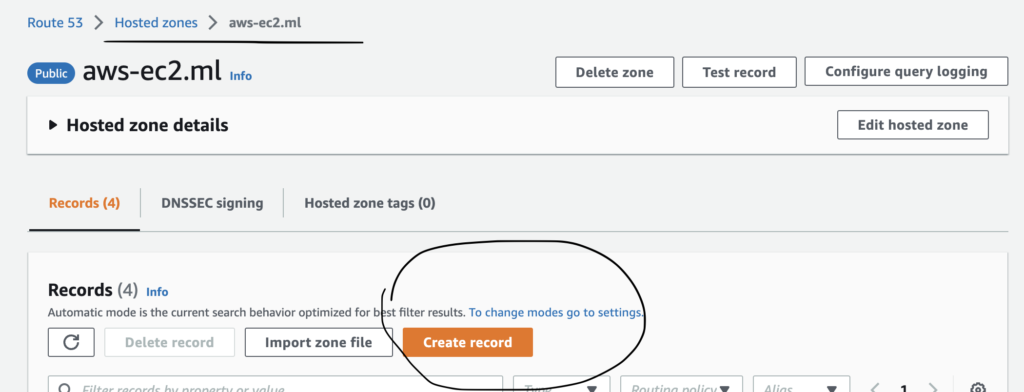
5. Now again visit hosted zone home page and there you will see your domain. Click on it and then create a new record
2 images attached
6. Add your ec2 ipaddress in the box
7. After creating the record, select nameserver and change the name server of your domain ( explained in more detail below. Check it there )
Your name server ( don’t put (dot . ) at the end of the domain and if the dot is present then remove it
On AWS dot is present at the end of the domain like
ns-1100.awsdns-09.org(.)
remove that dot and your original nameserver name is
ns-1100.awsdns-09.org
Now go to your domain provider and click on manage DNS after it click on change nameserver and pastes all of the nameserver URL in the fields
8. Done After following all the steps, you can wait 2-3 minutes, and then you can open your URL. Your website will be live now. If you don’t see the updated website then wait 1-2 hours because your cache is causing the problem
Optional
You can also add www CNAME in your domain name
steps
Select your domain present in hosted zone and then you will see lots of records
Click on a new record
In the subdomain section, write www, and in the route type select CNAME
Enter your domain name in the big section and then save it.
How to assign SSL to the domain name on Route53
Steps to generate a certificate in AWS
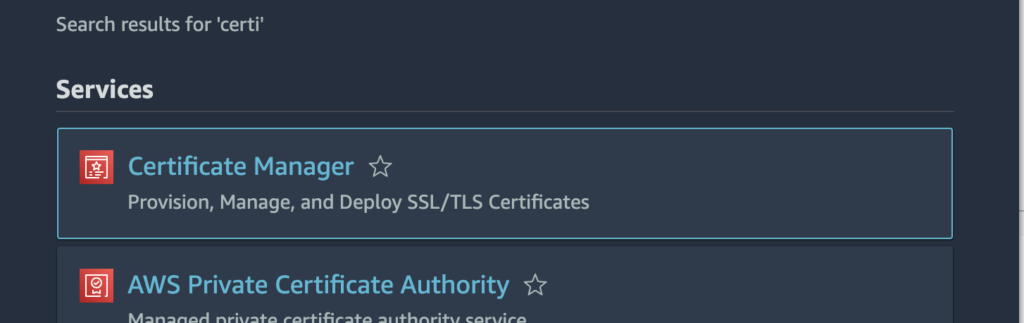
1- Visit the Certificate Manager page by searching it
2- Steps to issue a certificate
Before creating the certificate please make sure you are using the N-virginia server instead of Global or any another location
Click on the request certificate button
request a public certificate
Enter your domain name like yourdomainname.com and one more record for all subdomains like *.yourdomainname.com
3- Domain verification to issue a certificate
Steps
Next, to verify your domain, open route53, open hosted zones, select domain and then create new record
In the subdomain section enter the CNAME name value, select CNAME in the dropdown, and then enter the CNAME value in the big text
Again create a new record and in the subdomain write ( * ), select CNAME in the dropdown, and then enter the CNAME value in the big text
Steps to assign Certificate to the domain name in AWS
In order to assign a certificate to the domain name, we will use CloudFront.
Steps
Visit CloudFront
Create new distribution
In the origin domain, enter your ec2 public address which you can get (picture is attached
to get public ipv4 address
In protocol section, select only HTTP
In Viewer section, select on redirect HTTP to HTTPS
In Allow HTTP methods, select GET, HEAD, OPTIONS, PUT, POST, PATCH, DELETE
Enter the alternate domain name ( yourdomainname.com and *.yourdomainname.com )
enter domain name in cloudFront
In Custom SSL, select your custom certificate
if your certificate is not visible, create a new one and select location N-Virginia – us-east-1 during certificate creation
Now our CloudFront part is completed. Only the last step is required in route53 to complete the encryption setup
Before visiting the route53, make sure your new distribution status will not be deploying
Visit route53 and edit the record which is pointing toward the IP of your ec2 instance
allow alias
Search Cloud front and select it
In choose distribution field, choose your distribution which was created specifically to encrypt the particular domain
and then update the record.
Wait 3-5 mins to setup everything up. After it, you will see encryption on your website.
If you still facing the problem, you can reach out to me, I will help you to solve your problem. Thanks
Open ec2 service and on the left side there is an instances section, click on it
aws ec2 instances block
Step-2
Click on the launch instance button
to create new instance in aws
Step-3
Enter name, select amazon Linux, key pair ( make sure your key-pair name should be the same name as your username otherwise you would face a problem), and then allow traffic from all sources ( SSH, HTTP, HTTPS ).
allow traffic from all sources during creation of the ec2 instance
Step-4
launch the instance and wait 2-5 minutes for proper completion
How to connect with ec2 instance by ssh
First select instance and then click on connect button at the top of the table
ec2 instance connect button to go into the connection page
After redirecting to the connection page, select the ssh tab and follow all the steps which are mentioned. (step-3 and the example are important to connect your terminal with the instance ) but if you are using Windows you can connect with the ec2 instance by putty.
Environment setup to run MERN application on AWS ( ec2 instance )
in order to check whether Nginx is working or not, do the following steps
When the Nginx service is stopped, you will get the following message:
curl localhost:80
if your nginx is not working then you will see the following error
[root@ip-ADDRESS ec2-user]#  curl localhost:80
curl: (7) Failed to connect to localhost port 80 after 0 ms: Connection refused
So, let’s start the Nginx service:
sudo service nginx start
and then type
curl localhost:80
You will get an HTML page
You can also see the HTML page by visiting the public ipaddress of your ec2 instance
If you are not seeing the html page then you need to allow port 80 in your security group.
-> visit ec2 -> select instance -> on the bottom -> select security -> scroll down -> click on group name -> scroll and then click on edit inbound rule -> allow http and https both
Still, if you are facing the problem, recreate your instance with the following settings
create a new security group -> allow HTTP, HTTPS, and ssh
Steps to change the default Nginx config file to deploy the MERN application
First, open the config file by entering the following command
sudo nano /etc/nginx/nginx.conf
and paste the following code in the config file and change the port number according to your used port number. I am using 3000 for frontend and 8000 for the backend
complete Nginx config code to deploy the MERN application
# For more information on configuration, see:
# * Official English Documentation: http://nginx.org/en/docs/
# * Official Russian Documentation: http://nginx.org/ru/docs/
user nginx;
worker_processes auto;
error_log /var/log/nginx/error.log;
pid /run/nginx.pid;
# Load dynamic modules. See /usr/share/doc/nginx/README.dynamic.
include /usr/share/nginx/modules/*.conf;
events {
worker_connections 1024;
}
http {
log_format main '$remote_addr - $remote_user [$time_local] "$request" '
'$status $body_bytes_sent "$http_referer" '
'"$http_user_agent" "$http_x_forwarded_for"';
access_log /var/log/nginx/access.log main;
sendfile on;
tcp_nopush on;
tcp_nodelay on;
keepalive_timeout 65;
types_hash_max_size 4096;
include /etc/nginx/mime.types;
default_type application/octet-stream;
# Load modular configuration files from the /etc/nginx/conf.d directory.
# See http://nginx.org/en/docs/ngx_core_module.html#include
# for more information.
include /etc/nginx/conf.d/*.conf;
server {
listen 80;
listen [::]:80;
server_name _;
root /usr/share/nginx/html;
# Load configuration files for the default server block.
include /etc/nginx/default.d/*.conf;
location /api {
    rewrite /api/(.*) /$1 break;
   proxy_pass http://localhost:8000;
        proxy_http_version 1.1;
        proxy_set_header Upgrade $http_upgrade;
        proxy_set_header Connection 'upgrade';
        proxy_set_header Host $host;
        proxy_cache_bypass $http_upgrade;
    }

location /{
        proxy_pass http://localhost:3000;
        proxy_http_version 1.1;
        proxy_set_header Upgrade $http_upgrade;
        proxy_set_header Connection 'upgrade';
        proxy_set_header Host $host;
        proxy_cache_bypass $http_upgrade;
    }
error_page 404 /404.html;
#location = /404.html {
#}
error_page 500 502 503 504 /50x.html;
#location = /50x.html {
#}##
}
# Settings for a TLS enabled server.
#
# server {
# listen 443 ssl http2;
# listen [::]:443 ssl http2;
# server_name _;
# root /usr/share/nginx/html;
#
# ssl_certificate "/etc/pki/nginx/server.crt";
# ssl_certificate_key "/etc/pki/nginx/private/server.key";
# ssl_session_cache shared:SSL:1m;
# ssl_session_timeout 10m;
# ssl_ciphers PROFILE=SYSTEM;
# ssl_prefer_server_ciphers on;
#
# # Load configuration files for the default server block.
# include /etc/nginx/default.d/*.conf;
#
# error_page 404 /404.html;
# location = /40x.html {
# }
#
# error_page 500 502 503 504 /50x.html;
# location = /50x.html {
# }
# }
}
reload your Nginx
sudo systemctl reload nginx
after it, when you will visit your public ip address then you will see 502 bad gateway error, it’s mean everything is ready now we need to run our frontend and backend application
Procedure to clone project repo
sudo yum install git
if your repo is public then you only need to run the git clone command but if your repo is private do the following steps
generate ssh key
ssh-keygen -t ed25519 -C "your_email@example.com"
go to your .ssh folder
cd ~/.ssh
now copy your id_ed25519.pub by running the following command
cat id_ed25519.pub
add this to your github account
visit your github profile -> go to settings by clicking on the top right corner of your profile -> select ssh and GPG keys -> click on new ssh key button -> paste the public key on the description box and you can add any name
Now clone your repo by ssh URL
go to your frontend and install all the packages but if you find an error in installing the packages then do the following steps
after it adds the following config in your frontend folder, push it to your GitHub repo and then run the git pull origin master command so you can pull the latest changes in your ec2 server
after pulling the latest changes in your ec2 server then run the following command to run your frontend but before this make sure your react app knows your latest backend URL and your latest backend URL will be like /api
npm run start:production
for this, I will suggest your code must get the URL from the env file and you only need to update your env file to update the backend URL
you can create an env file in your frontend folder or backend folder like
nano .env
paste your .env variables in your env file and then press
control X
press y
press enter
it will create your .env file
npm run start:production
if you want to check whether your react app is working or not then run the following commands
pm2 logs
Similarly, we will run the node app
First, copy the following app.config.json code in your node project and push the latest changes in your github repo and then pull it in your ec2 instance
if you want to check whether your node app is working or not then run the following commands
pm2 logs
Running Demo
now you can visit the public ipaddress again and you will see your website
In the next upcoming lecture, I will show you how you can assign a domain and encrypt your domain properly. I will also write an article on how you can create a pipeline so you don’t need to do these steps again and again instead of it you only need to push the code into your repo and everything will occur automatically.
if you like my article, connect me on LinkedIn and share it with your friends😊
This tutorial will help you to understand the integration of typeorm with graphql(type-graphql)
This article will guide you on how you can integrate typeorm with type-graphql. After following this article you don’t need to worry about the integration and standards. I will teach you according to the standards that you can implement in your professional project.
This article is mostly focused on the integration of typeorm and type-graphql and it will touch typeorm and type-graphql generally instead of going into the detail. So if you want to learn in detail you can check my typeorm and type-graphql tutorial
It is a TypeScript ORM library that helps to link your TypeScript application with a relational database. In this topic, we will cover the following content
Entity creation with relations
Database connection
Entity Creation with relations
We are going to create 4 entities User, Cart, Product, and Profile. First I will explain to you the basic terms
@Entity() used to create a new table in a database
@Column() used to create a new column in a table
@PrimaryGeneratedColumn() is used to add a primary column in a table
@CreateDateColumn() to help you to create the createdAt column in the table which will help you to track when the record was created.
@UpdateDateColumn() will update the specific column (updatedAt) every time when you update the record
@OneToOne(() => Profile, (profile) => profile.user) it is used to set a one-to-one relation with a profile. The arrow function is passed to set the relation with another entity. and the second param is used to set the bi-direction relation with another entity column. If you don’t pass the second parameter then it means you are setting the uni-direction relation
@OneToMany(() => Product, (product) => product.user) it’s mean you current class can belong to multiple records of the product but multiple products belong to a single class
@ManyToOne(() => User, (user) => user.products) the same explanation as the above point. The current class has multiple records but belongs to a single User
@JoinColumn to set custom reference columnName. And it is an optional decorator
@ManyToMany(() => B) current class A has multiple instances of B and the B can belong to multiple instances of the class A
@JoinTable() necessary for many-to-many relationship to join the table
this._appDataSource = new DataSource({
      type: config.dbType,
      host: config.dbHost!,
      port: config.dbPort,
      username: config.dbUsername,
      password: config.dbPassword,
      database: config.dbName,
      entities: this.entities, // here you can pass all of your entities like [User, Product]
      synchronize: true, // makes the entity sync with the database every time you run your application
    });

try {
      await this._appDataSource.initialize();
      console.log("Data Source has been initialized!");
    } catch (err) {
      console.error("Error during Data Source initialization", err);
    }
Type-graphql
It is used to build graphql API’s with node and typeScript. It helps to define schema directly from our typescript code.
Before Creating schemas, I am sharing a few terminologies concepts with you so you can’t confuse by reading the code
@ObjectType() creates a new Schema in graphql
@Field() creates a new field in a schema and if you want to make the field optional then you can pass { nullable: false } in Field function.
@Field((type) => [Product], { nullable: true }) It means you’re current field in a particular schema either returns an array of Product or null.
@Field((type) => Product, { nullable: true }) It means you’re current field in a particular schema either returns a Product or null.
Now we will add type-graphql decorators in typeorm class also so we can build a graphql schema.
Entity schemas in type-graphql
You only need to add @Field() in an entity class below the @column() decorators and @objectType() below the @Entity() decorators and the rest of the things will be handled by type-graphql.
Just like schema, you also need to understand some basic concepts related to the resolver
@Query(() => ReturnSchema) used to create a query resolver and the arrow function defines what will be returned. It also accepts second args which means you can pass optional params also like {nullable:true} which means your query can return a null value.
@Mutation(() => User) used to create a mutation resolver and the arrow function defines what will be returned.
@Arg(“argname”)it is used to pass a param in a function
@FieldResolver(() => ReturnSchema) used to create a resolver on a field level and the arrow function defines what will be returned. It also accepts second args which means you can pass optional params also like {nullable:true} which means your query can return a null value.
@Root() is used with fieldResolver to fetch the parent value from the parent resolver ( query or mutation )
@ArgsType() If you want to pass multiple args in a function you can build a separate argsType class and then pass it to the function. It will help you a lot in architecture and extending the application
If you are using the typeorm, you don’t need to specify the field resolver instead of it you can fetch all the related records in typeorm easily and rest of the thing will be handled by typegraphql easily
Example
 @Query(() => [Product], { nullable: true })
  async products(): Promise<Product[] | null> {
    return await Product.find({
      relations: {
        user: { profile: { user: true }, products: true, }, // it will fetch user record and profile record must be present in user record, same for profile
        cart: true, // you are only fetching the cart record and no inner record will be present in cart like cart { products {}}
      },
    });
  }
User Resolver
import {
  Arg,
  Args,
  FieldResolver,
  Mutation,
  Query,
  Resolver,
  Root,
} from "type-graphql";

import { CreateNewUserArgs } from "./types";
import { Product } from "../../schema/Product";
import { User } from "../../schema/User";
import { encodePassword, generateToken } from "../../../utils/helpers";
import { Profile } from "../../schema/Profile";

@Resolver(() => User)
export class UserResolver {
  @Query(() => [User], { nullable: true })
  async users(): Promise<User[] | null> {
    const allUsers = await User.find({
      relations: { products: true, profile: true },
    });
    return allUsers;
  }

  @Mutation(() => User)
  async createUser(
    @Args()
    { firstName, lastName, email, password, phoneNumber }: CreateNewUserArgs
  ) {
    // create profile record with user with default value, so later user can update his record
    const profile = Profile.create({
      profilePic: "..", // default value
      aboutMe: "..", // default value
    });

    const user = User.create({
      firstName,
      lastName,
      email,
      password: await encodePassword(password),
      phoneNumber,
    });

    await user.save();

    await profile.save();

    // update user record again with profile record
    user.profile = profile;
    await user.save();

    const token = await generateToken({ email: user.email, id: user.id });

    return { ...user, token };
  }
}
In short, in this article, we learn about basic typeorm and type-graphql. It also explains the integration of typeorm with graphql(type-graphql) with code examples. If you still have a question you can reach out to me on LinkedIn. I will try my best to answer your question
This tutorial is specially designed for those people who try to learn new concepts with the help of programming without going too much into the theory.
It is used to build graphql API’s with node and typeScript. It helps to define schema directly from our typescript code.
In this tutorial, we will cover the following topics
Type-graphql setup
Detail schema and resolver overview
Relations in graphql
General steps to set up the type-graphql
Create Express server
Create a Resolver with schema
Build Schema by using buildSchema function from type-graphql
Create an apollo server by passing schema in the apollo server
Start the apollo server before the express server
Step 1
Final Code is attached at the end of the article but you can download the basic code setup with all of the necessary dependencies.
@Query() is used to create a Query resolver. Its first param defines what will be the return type. In the second param, you can pass many optional params but by passing {nullable:true} means you are expecting a null value from the query function
import { Query, Resolver } from "type-graphql";
import { UserSchema  as User} from "../../schema/UserSchema";

@Resolver(() => User)
export class UserResolver {
  @Query(() => [User], { nullable: true })
  async users(): Promise<User[] | null> {
    return [];
  }
}
Step 3
Now we will buildSchema by using buildSchema type-graphql function.
await buildSchema({
      resolvers: [UserResolver],
      validate: { forbidUnknownValues: false },
      nullableByDefault: false, // by default all fields are not optional
    });
Step 4
Basic code to set up the apollo server. First, build the schema and then pass it to graphql.
const schema = await buildSchema({
      resolvers: [UserResolver],
      validate: { forbidUnknownValues: false },
      nullableByDefault: false, // by default all fields are not optional
    });

    const apolloServer = new ApolloServer({
      schema,
      context: ({ req }) => {
        return {
          req,
        };
      },
    });
    await apolloServer.start();
    apolloServer.applyMiddleware({ app });
Complete Code Example with schema and apollo server. This example is using the class-based approach. You can convert it into a functional-based approach
import { NonEmptyArray, buildSchema } from "type-graphql";
import { GraphQLSchema } from "graphql";
import { UserResolver } from "./resolvers/UserResolver";
import { ApolloServer } from "apollo-server-express";
import { Express } from "express";

class GraphQl {
  private _schema: GraphQLSchema;

  private resolvers(): NonEmptyArray<Function> | NonEmptyArray<string> {
    return [UserResolver];
  }

  async buildGraphQLSchema() {
    this._schema = await buildSchema({
      resolvers: this.resolvers(),
      validate: { forbidUnknownValues: false },
      nullableByDefault: false, // by default all fields are not optional
    });
  }

  async startApolloServer(app: Express) {
    await this.buildGraphQLSchema();
    const apolloServer = new ApolloServer({
      schema: this.schema,
      context: ({ req }) => {
        return {
          req,
        };
      },
    });
    await apolloServer.start();
    apolloServer.applyMiddleware({ app });
  }

  get schema() {
    return this._schema!;
  }
}

const graphQl = new GraphQl();

export default graphQl;
Step 5
Main Server file
import express from "express";
import { db } from "./database/db";
import graphQl from "./graphql";

const app = express();

db.connect();
app.use(express.json());

graphQl.startApolloServer(app);

const PORT = process.env.PORT || 3000;
app.listen(PORT, () => {
  console.log(
    `server is listening on the port ${PORT} graphql: http://localhost:${PORT}/graphql`
  );
});
It is a function that resolves a value for a type or field within a schema
How you can define a resolver in type-graphql?
You can follow the following steps to define the schema in type-graphql
Create a Class
Add @Resolver(() => YourSchemaClassName) decorator at the top of the class
To build a query resolver, add@Query(() => YourSchemaClassName) decorator at the top of the function.
Same way for mutation just like query resolver. But in mutation, you need to understand some other concepts also like adding @Arg() in param so type-graphql can know that you are accepting the particular argument in your mutation function
Examples
Basic Query resolver example
import { Query, Resolver } from "type-graphql";
import { UserSchema  as User} from "../../schema/UserSchema";

@Resolver(() => User)
export class UserResolver {

//[User] mean return result will consist of array of users, or you can imagine like typescript user[]

@Query(() => [User], { nullable: true }) // nullable mean your query can return null

async users(): Promise<User[] | null> {
    return [];
  }
}
2. Basic Mutation example
import { Arg, Mutation, Query, Resolver } from "type-graphql";
import { UserSchema as User } from "../../schema/UserSchema";

@Resolver(() => User)
export class UserResolver {

  @Mutation(() => User)
  async createUser(@Arg("firstName") firstName: string) {
    console.log("firstName ", firstName);
  }
}
If you want to pass multiple arguments in mutation function, then it is preferable to create a new ArgsType class
This tutorial will teach you about the basics of the typeorm library. After reading this article you can easily use the typeorm in your project.
It is a TypeScript ORM library that helps to link your TypeScript application with a relational database. It supports all of the major relational databases like MySql, PostgreSQL, SQLite, etc.
This typeorm tutorial will cover all of the basic concepts like
Database connection
Table/Entity Creation
Table/Entity relations
CRUD Operation
Final Code is attached at the end of the article but you can download the basic code setup with all of the necessary dependencies.
First, we will set up a typeorm connection with a database. Here is the code to connect typeorm with the database
Basic Code
this._appDataSource = new DataSource({
      type: config.dbType,
      host: config.dbHost!,
      port: config.dbPort,
      username: config.dbUsername,
      password: config.dbPassword,
      database: config.dbName,
      entities: this.entities, // here you can pass all of your entities like [User, Product]
      synchronize: true, // makes the entity sync with the database every time you run your application
    });

try {
      await this._appDataSource.initialize();
      console.log("Data Source has been initialized!");
    } catch (err) {
      console.error("Error during Data Source initialization", err);
    }
Complete Code in a class-based approach.
import { DataSource, DeepPartial, EntityTarget, ObjectLiteral } from "typeorm";
import { config } from "../config";

class SetupConnection {
  private _appDataSource: DataSource;
  private _entities = []; // will contain all tables list

  get entities() {
    return this._entities;
  }

  async connect() {
    this._appDataSource = new DataSource({
      type: config.dbType, // postgresql or MySql
      host: config.dbHost!,
      port: config.dbPort,
      username: config.dbUsername,
      password: config.dbPassword,
      database: config.dbName,
      entities: this.entities,
      synchronize: true,
    });

    try {
      await this._appDataSource.initialize();
      console.log("Data Source has been initialized!");
    } catch (err) {
      console.error("Error during Data Source initialization", err);
    }
  }

  get dataSource() {
    return this._appDataSource;
  }

  async save(
    entity: EntityTarget<ObjectLiteral>,
    record: DeepPartial<ObjectLiteral>
  ) {
    const userRepository = db.dataSource.getRepository(entity);
    await userRepository.save(record);
  }
}

// don't need to create new database connection on each time, one connection is enough to prevent memory out of exception error
export const db = new SetupConnection();
New table creation in Typeorm
Table creation in typeorm is very easy, you only need to understand a few terminologies to create the tables in typeorm
@entity() creates a new table in a database
extend each class from BaseEntity class also to inherit basic functions like save function
@column() creates a new column in the table. You can also pass params in the column decorator like @column({type: “numeric”})
@PrimaryGeneratedColumn() creates a new primary key column in the table
@CreateDateColumn() help you to create the createdAt column in the table which will help you to track when the record was created.
@UpdateDateColumn() will update the specific column (updatedAt) every time when you update the record
Now you have successfully created the one-to-one relationship between a user and the profile
One-to-Many/many-to-one relation in typeorm
@oneToMany() decorator is used when class A has multiple instances of B. Similarly @ManyToOne() is used when the B class has only one instance of A.
Example
Explanation with the help of a user and a product class. In an e-commerce store, a user can add multiple products but a product should belong to one user
Add the following code at the end of the User class
Add the following code at the end of the Product class
@ManyToOne(() => User, (user) => user.products)
  // @JoinColumn({ name: "user_id" }) // optional if user want to change the name of the column
  user: User;
Many-to-many relations in typeorm
@manyToMany() a relationship is used when class A has multiple instances of B and B also have.
Example
A product can add to multiple carts and a cart can contain multiple products
Add the following code at the end of the Cart class
After creating all the entities and the relationships between them, now add all of the entities in the entity array which is present in SetupConnection class. I have already shared the SetupConnection class code with you, so you can copy that code and update its entity field like
You can further clean your entity classes by using the inheritance concept.
Create one Base entity class which will contain the common fields like id, createdAt, and updatedAt
Next time, whenever you need to create an entity class you can extend the base class. In this way, you don’t need to repeat the id, createdAt, and updatedAt fields again and again in every entity class.
Example
import {
CreateDateColumn,
Entity,
PrimaryGeneratedColumn,
UpdateDateColumn,
BaseEntity
} from "typeorm";
@Entity()
export class Base extends BaseEntity {
@PrimaryGeneratedColumn()
id: number;
@CreateDateColumn()
createdAt: Date;
@UpdateDateColumn()
updatedAt: Date;
}
import { JoinTable, ManyToMany } from "typeorm";
import { Product } from "./Product";
import { Base } from "./Base";
export class Cart extends Base {
@ManyToMany(() => Product)
  @JoinTable()
  product: Product[];
}
Conclusion
In short, in this article, we learn about typeorm database connection setup and relations between entities with code examples.
If you still have a question you can reach out to me on LinkedIn. I will try my best to answer your question.